
Connect a 3V solar panel to a small DC motor with two wires, push a propeller onto the motor shaft, mount everything on a cardboard base, and take it into bright sunlight. The panel turns light into electricity, which spins the motor and the fan blades.
Have you ever wondered how the sun can power a fan, a car, or even a whole house? In this hands-on STEM activity, you'll build your very own solar-powered fan using a tiny solar panel, a small motor, and a few craft supplies you probably already have at home.
When you carry your finished fan outside on a sunny day, the panel soaks up sunlight and turns it into electricity. That electricity zips through the wires, spins the motor, and — whoosh! — your fan blades start whirling, giving you a cool breeze powered entirely by the sun. It's clean energy you can hold in your hands.
This project is perfect for curious kids in India who want to understand renewable energy, finish a school science fair project, or just build something genuinely cool on a sunny afternoon. No plugs, no batteries, no pollution — just sunshine and science.
- Solar panels convert sunlight into electricity using the photovoltaic effect
- A complete electric circuit requires a power source, wires, and a load (the motor)
- Direct, bright sunlight produces more electricity than dim or cloudy light
- Positive (+) and negative (-) wires must connect correctly for the motor to spin
- Reversing the wire connections reverses the spin direction of the motor
- Small solar panels (3V to 6V) are safe for kids and cannot give electric shocks
- Renewable energy from the sun is clean and produces no pollution
What you'll need
Materials
- 1 Small solar panel (3V to 6V, 0.5W to 2W) optional
- 1 Small DC hobby motor (1.5V to 6V)
- 1 Plastic propeller or fan blade (with a small hole that fits the motor shaft)
- 1 pair Two thin insulated wires with alligator clips (or 20 cm of regular wire)
- 1 piece, about A4 size Cardboard sheet (from any old box)
- 1 roll Sticky tape or double-sided tape
- 1 Glue stick or non-toxic craft glue
- Coloured paper or paint to decorate
- A small on/off switch
Tools
- A pair of safety scissors (kid-safe)
- A ruler
- A pencil
- A clean, flat workspace
- A small screwdriver to tighten clips
Step-by-step
-
1
Gather everything in one place ⏱ 2 min
Lay all your materials out on a flat table or the floor. Tick them off the list one by one. It is much easier to build something when nothing is missing halfway through.
If you don't have a solar panel or motor at home, both are easy to find at hobby shops, school project stores, or online marketplaces in India for under ₹250 together. Many cities also sell ready-made solar fan DIY kits that include all the parts.
Tip: Keep the small parts (motor, propeller) inside a small bowl or lid so they don't roll off the table.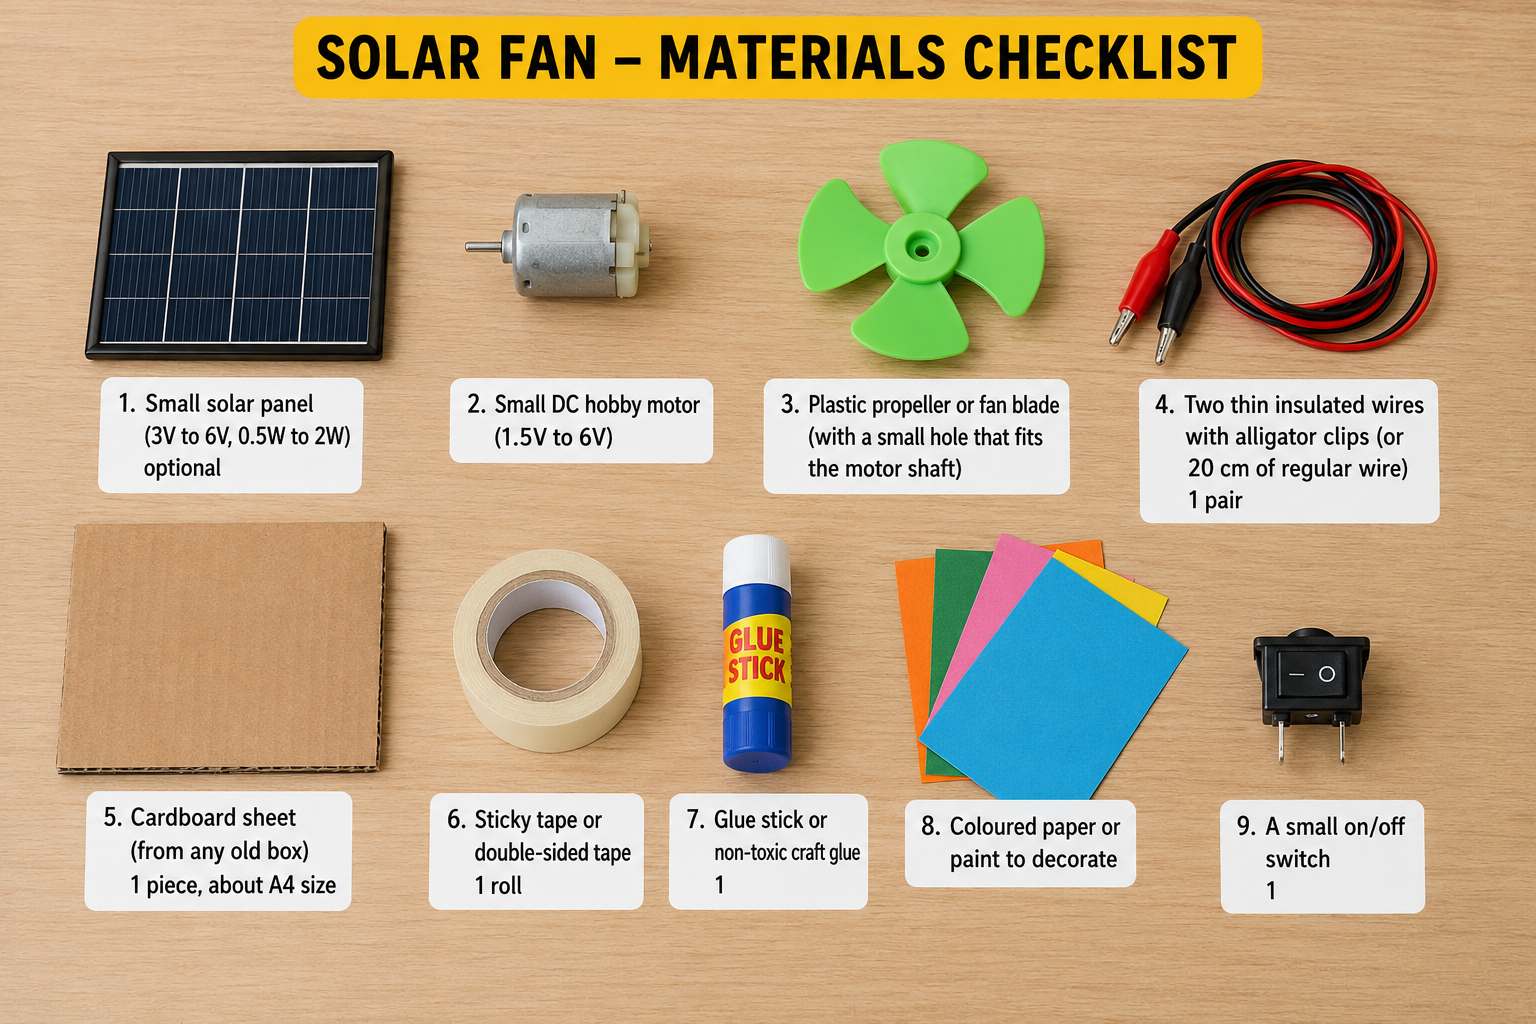
-
2
Cut the cardboard base ⏱ 2 min
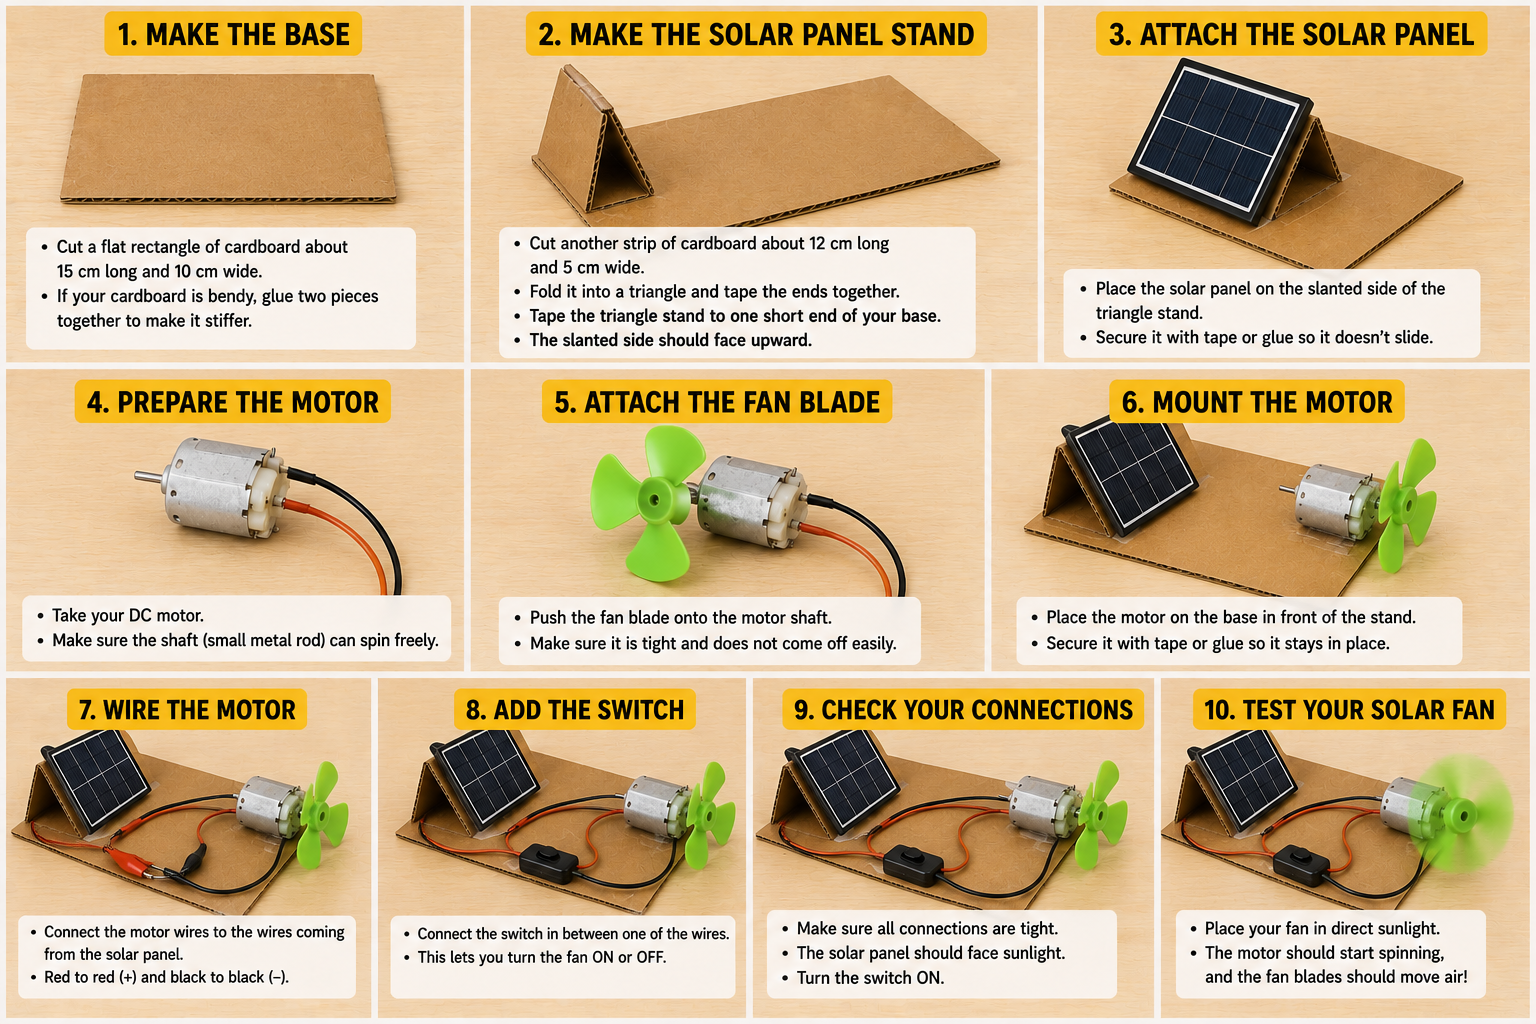
Take your cardboard sheet and cut a flat rectangle about 15 cm long and 10 cm wide. This will be the base of your fan, like the floor of a tiny room where everything sits.
If your cardboard is bendy, glue two pieces together to make it stiffer. A stiff base means a steady fan that won't wobble when the motor spins.
Tip: Ask an adult to help with the first cut if the cardboard is thick.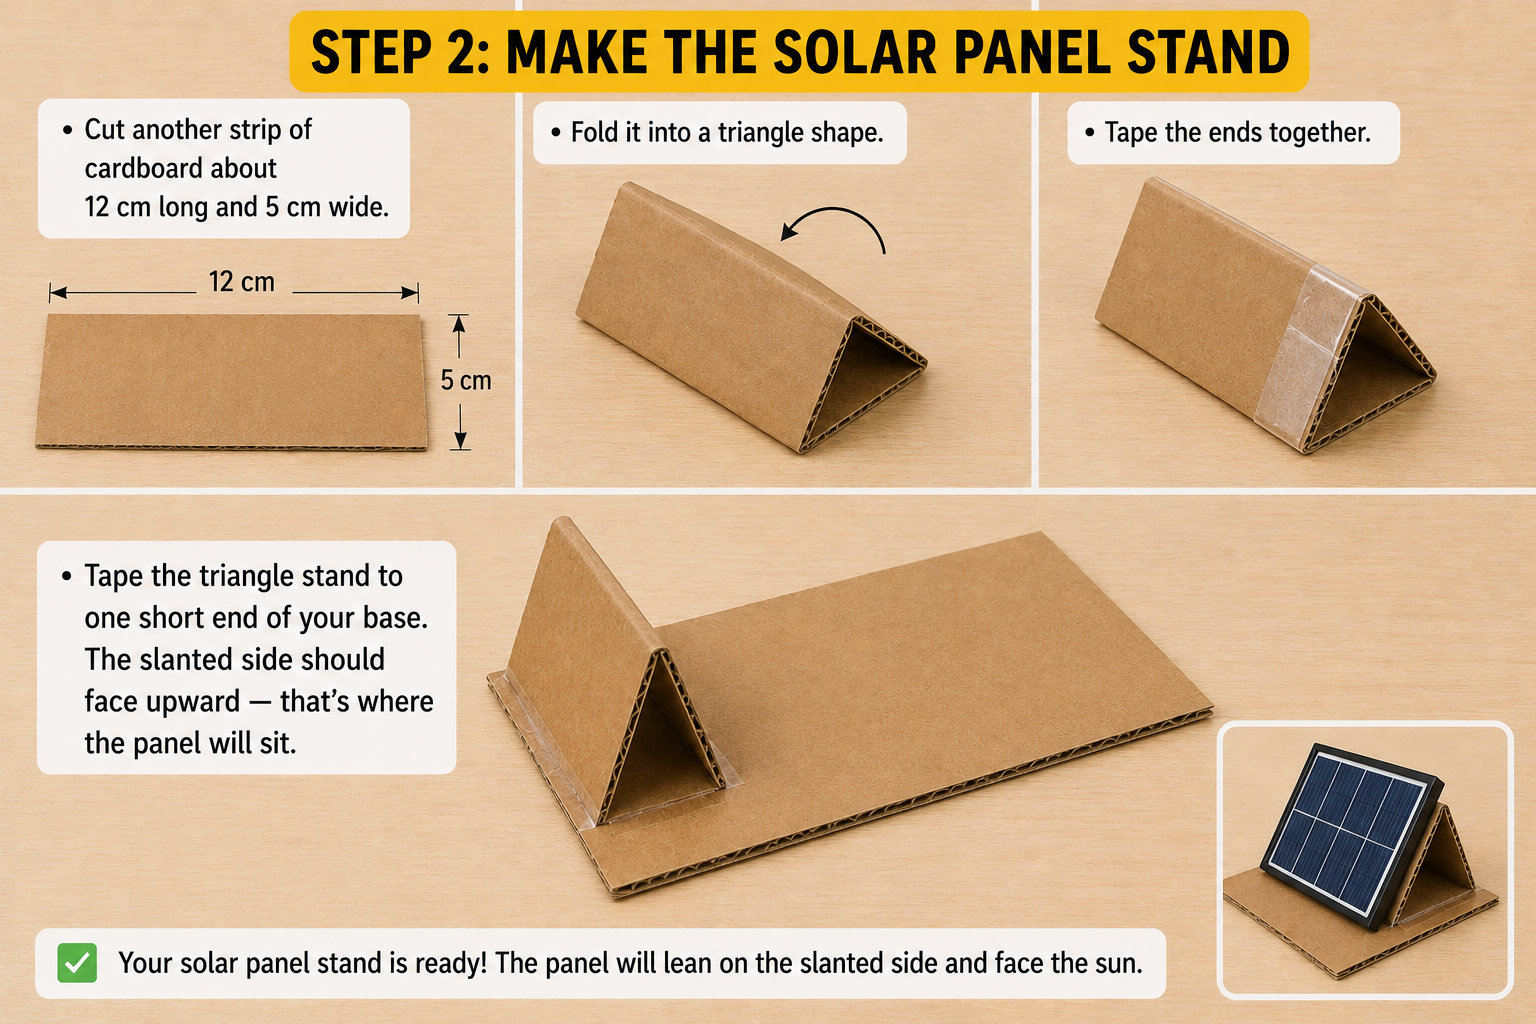
-
3
Make a stand for the solar panel ⏱ 4 min
Cut another strip of cardboard about 12 cm long and 5 cm wide. Fold it into a triangle shape and tape the ends together. This little triangle will hold your solar panel up at an angle so it can drink in the sunlight.
Tape the triangle stand to one short end of your base. The slanted side should face upward — that's where the panel will sit.
-
4
Attach the solar panel to the stand ⏱ 3 min
Place your solar panel on the slanted side of the triangle. The shiny dark side (the side with the blue or black squares) must face upward — that's the side that catches sunlight.
Stick the panel down with two pieces of double-sided tape or a small loop of regular tape. Make sure the two little wires coming out of the panel are free and not buried under the tape.
Tip: Don't cover the front of the panel with tape — even a tiny strip can block sunlight and make your fan slower. -
5
Mount the motor on the other end ⏱ 3 min
Take your small DC motor and place it at the opposite end of the base, sitting upright with the metal shaft (the spinning part) pointing forward — away from the panel, like a tiny rocket about to launch.
Stick the motor down firmly with strong tape or a blob of glue. The motor must not move or wobble, or the propeller will hit the cardboard.
Tip: Leave a small gap (about 1 cm) between the front of the motor and the edge of the base, so the propeller has room to spin freely. -
6
Push the propeller onto the motor shaft ⏱ 2 min
Find the tiny hole in the middle of your propeller. Line it up with the metal shaft of the motor and gently push it on. It should fit snugly — not so loose that it falls off, and not so tight that it bends.
Give the propeller a gentle flick with your finger. It should spin freely without rubbing on anything.
Tip: If the propeller is loose, wrap a tiny bit of tape around the shaft first, then push the propeller back on. -
7
Connect the wires ⏱ 4 min
Now for the magic part — making the circuit! You need to join the two wires from the solar panel to the two wires (or two metal tabs) on the motor.
Use the alligator clips: clip one end of the first wire to the red (+) wire of the solar panel, and the other end to one terminal of the motor. Clip the second wire from the black (-) wire of the panel to the other motor terminal.
If you don't have alligator clips, an adult can twist the bare metal ends of the panel wires and motor wires together and wrap them tightly with sticky tape.
Tip: If the fan spins the wrong way (blowing air backwards), just swap the two connections — that reverses the direction. -
8
Test it in sunlight ⏱ 3 min
Carry your fan outside on a sunny day, or place it on a windowsill where bright sunlight is falling directly on the panel. Within a few seconds, the propeller should start spinning and you'll feel a tiny breeze on your face!
Tilt the panel so it faces the sun directly. The straighter the sunlight hits the panel, the faster your fan will spin.
Tip: Cloudy day? Try testing under a strong table lamp or a torch held very close to the panel — it might still spin, just more slowly.
The science behind it
Your solar panel is made of special slices called photovoltaic cells. When sunlight hits these cells, it knocks tiny particles called electrons loose inside the silicon material. Those moving electrons are what we call electricity.
The electricity flows out of the panel through one wire, travels into the motor, and comes back through the second wire — completing a loop called a circuit. Inside the motor, the electric current creates a magnetic force that pushes a coil round and round. That spinning coil turns the motor shaft, which turns your propeller, which pushes air — and that's your breeze!
The brighter the sun, the more electrons get knocked loose, the more electricity flows, and the faster your fan spins. This is exactly how the giant solar panels on rooftops in India power lights, fridges, and even electric cars. Your tiny fan works on the very same principle.
What kids learn
- Understand how solar panels turn sunlight into electricity (the photovoltaic effect)
- Learn what an electric circuit is and why it must be a complete loop
- Discover the difference between positive (+) and negative (-) terminals
- See renewable energy in action and why it matters for the planet
- Practice fine motor skills, careful measuring, and following step-by-step instructions
- Build confidence in basic engineering and problem-solving